If you are staring at a blinking light on your Google speaker while the app repeatedly throws “Device Not Found” or “Could Not Communicate” errors, take a deep breath. You are not alone, and your device isn’t broken. It is incredibly frustrating when a smart assistant suddenly refuses to talk to your internet, but most of the time, the fix only takes a couple of minutes.
The problem is that most online guides just copy-paste the official manual. They don’t tell you what to do when things actually go wrong. In this guide, we will look at exactly how to connect Google Home to WiFi, including those hidden router settings and phone permissions that cause 90% of setup failures. Let’s get your speaker back online without the headache.

A Quick Checklist Before You Start
Before we press any buttons, let’s make sure the basics are sorted out. Skipping these is the biggest reason why setups fail halfway through:
- Power check: Your Google Home or Nest device needs to be securely plugged into the wall and turned on.
- App update: Make sure you have the latest version of the Google Home app installed on your phone.
- Phone toggles: Turn on your phone’s Wi-Fi, Bluetooth, and Location Services right now.
- Wi-Fi password: Keep your Wi-Fi password ready. Remember, uppercase and lowercase letters matter!
Step-by-Step: How to Connect Google Home to WiFi for the First Time
If you just opened a brand-new speaker, this is the exact path you need to follow to get it connected smoothly.
Step 1: Plug It In and Wait
Plug the power adapter into the wall. Give the speaker about 45 seconds to boot up completely. You will know it is ready when the lights stop spinning or the speaker physically speaks a welcome message to you.
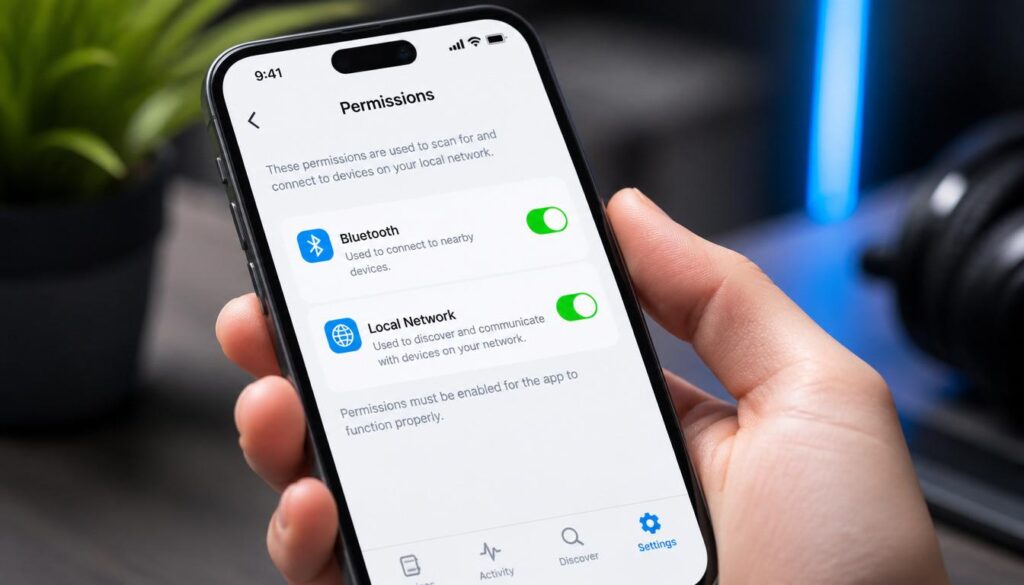
Step 2: Fix Your Phone’s Hidden Permissions
This is where most people get stuck. If your phone’s security settings are blocking the app, it will never find the speaker.
How to Connect Google Home to WiFi
- If you use an Android: Go to your phone’s Settings > Apps > Google Home > Permissions. Make sure Location and Nearby Devices are turned allowed.
- If you use an iPhone: Open your main iPhone Settings, scroll all the way down to Google Home, and make sure the Bluetooth and Local Network toggles are switched ON. If Local Network is off, your iPhone will never see the speaker.
Step 3: Open the App and Scan
Launch your Google Home app. If your phone’s Bluetooth is on, a small card should automatically pop up at the bottom of the screen saying “Set up Google Home Mini” (or whatever device you have).
If you don’t see that pop-up, don’t worry. Just tap the Devices tab at the bottom menu, hit the floating + Add button, and select New Device. Choose your home profile, and the app will start scanning.
Step 4: Listen for the Sound
Once the app finds your speaker, tap on it. To verify that you are connecting the right device, the speaker will play a short chime or sound. If you hear it, tap Yes in the app.
Step 5: Put in Your Wi-Fi Details
Now comes the main part of how to connect Google Home to WiFi. The app will show you a list of nearby wireless networks.
- Tap your home Wi-Fi network.
- Carefully type in your password.
- Hit Connect.
Your phone will now share the internet details with the speaker. Give it a minute, and you will see a success screen. You have officially completed how to connect Google Home to WiFi for a new device!
You can also this Video Guide to see step by step connection process.
Changed Your Router? How to Connect Google Home to WiFi After an Internet Upgrade
If you just got a new fiber connection, a new modem, or you simply changed your Wi-Fi password, your Google Home will disconnect and blink silently.
A common mistake is trying to just update the settings. It doesn’t work that way. You have to tell the app to forget the old network first before you can link it to the new one.
Step 1: Wipe the Old Network Profile
- Make sure your smartphone is connected to your new Wi-Fi network.
- Open the Google Home app and go to the Devices tab.
- Tap and hold your speaker’s tile, then tap the Gear icon (Settings) at the top right corner.
- Tap on Device Information and then tap on Wi-Fi.
- Select Forget This Network.
Step 2: Set It Up Fresh
Once you forget the old network, the speaker will drop back into setup mode. Go back to the main screen of the Google Home app, tap + Add, select your device, and type in your new Wi-Fi password. This is the cleanest way how to connect Google Home to WiFi after changing routers without getting stuck in a glitchy loop.
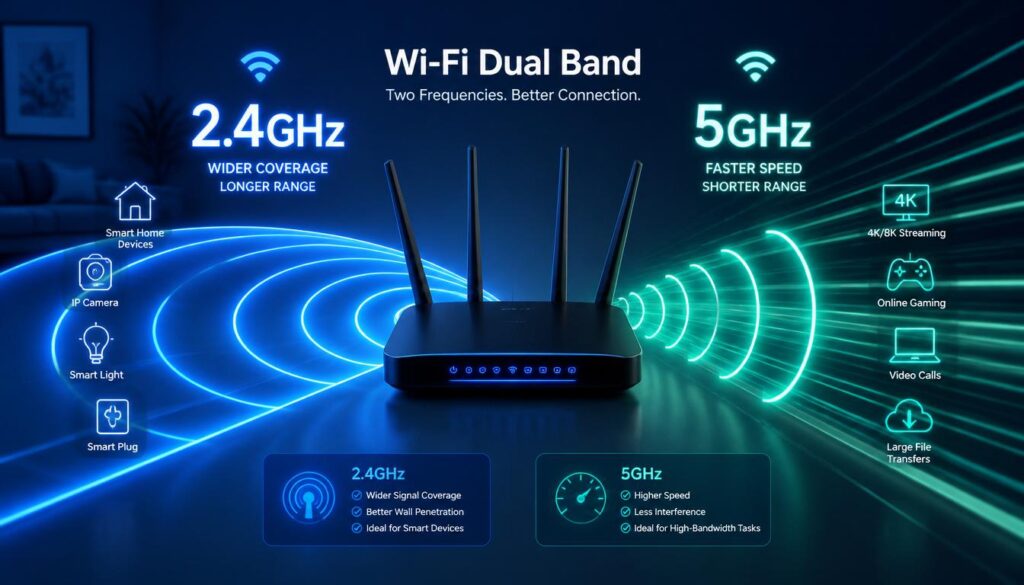
The 2.4GHz vs 5GHz Router Trap (Why Your Setup Keeps Failing)
Are you stuck on a spinning loading screen that eventually ends with a “Failed to connect” message? The blame almost definitely lies with your modern internet router.
How to Connect Google Home to WiFi
What is Band Steering?
Most modern routers broadcast two different signals: 2.4GHz (slower but covers a long distance) and 5GHz (super fast but short range). To make things simple, new routers combine both bands into one single Wi-Fi name (like Home_Internet).
Your phone automatically switches between them behind the scenes. But smart home speakers like Google Home struggle with this. During setup, if your phone is sitting on the 5GHz lane and your speaker tries to talk to the 2.4GHz lane, the connection breaks down immediately.
The Quick Technical Workaround
If you suspect this is happening while trying to figure out how to connect Google Home to WiFi, here is what you need to do:
- Log into your router’s settings page via a web browser (usually by typing
192.168.1.1into the URL bar). - Look for the Wi-Fi settings and temporarily turn off the 5GHz band, or give the two bands different names (e.g., Home_2.4G and Home_5G).
- Connect your phone specifically to the 2.4GHz network.
- Run the Google Home setup again. It should slide through without a single error.
- Once the speaker is working, you can go back to your router settings and turn the 5GHz band back on.
Troubleshooting Common Errors Like a Pro
If you followed the standard steps and the device is still acting up, use these real-world troubleshooting fixes to clear out the bugs.
The App Can’t Find the Speaker?
- If you are constantly facing the google home app device not found error during the scan, so do not panic try these three easy step
- Get closer: Bring your phone, the router, and the Google Home speaker into the same room, within 10 feet of each other, just for the setup. You can move the speaker back to its original spot later.
- Cycle Bluetooth: Turn your phone’s Bluetooth off, wait 15 seconds, and turn it back on. This clears out stuck connections.
- The total restart: Unplug your router and your Google Home speaker from the wall. Wait a full minute. Plug the router back in first, wait for the Wi-Fi to start working, and then plug the speaker back in. Try the setup again.
How to Connect Google Home to WiFi
How to Connect Google Home to WiFi
Fixing the “Could Not Communicate With Your Google Home” Error
Fix Google Home Could not communicate with your Google Home Mini.
This error means your phone can see the speaker via Bluetooth, but they can’t establish a secure local network connection.
The easiest fix? Turn off Mobile Data on your phone temporarily. When a phone senses that it is connecting to a smart speaker that doesn’t have live internet yet, it will secretly switch back to cellular data to keep you online. Turning off mobile data forces your phone to stay focused on the speaker setup. Also, make sure to close any active VPNs, as they completely mess up local network tracking.
What to Do If It Says “Connected But No Internet”
If the setup finishes but the speaker says it can’t reach Google servers:
- Avoid Guest Networks: Do not set up your Google Home on a “Guest” Wi-Fi profile. Routers have a built-in security feature called AP Isolation on guest networks, which prevents smart devices from talking to phones.
- Check Custom Router Settings: If you use a custom DNS or an ad-blocker like Pi-Hole on your home network, it might be blocking Google’s backend data. Try switching your router’s DNS back to automatic or use Google’s public DNS (
8.8.8.8).
How to Connect Google Home to WiFi After a Factory Reset
When nothing else works, starting completely fresh is the absolute best option. A factory reset wipes out all cached errors and broken profiles, making the speaker behave like it just came out of the factory box.
- Find the reset button: On an older Google Home Mini, press and hold the tiny physical button on the bottom shell (right near the power cord entry). On newer Nest speakers, turn off the physical microphone privacy switch first, then press and hold the center of the top surface.
- Hold for 15 seconds: Keep pressing down until the speaker verbally warns you that it is resetting.
- Run the app setup: Once the reboot finishes, open your app, go to the Devices tab, and start a fresh pairing cycle.
Learning how to connect Google Home to WiFi after a factory reset is often the fastest shortcut to fix an older speaker that has been sitting in a drawer or acting buggy for months.
How to Connect Google Home to WiFi

How to Connect Google Home to WiFi
A Clever Shortcut: Can You Connect via a Laptop or PC?
What if your smartphone app is completely broken or won’t stop crashing? Google officially ended its official desktop app support a long time ago, but there is still a clever technical trick you can use to push network details using a computer:
- Turn on your laptop or Mac’s Wi-Fi.
- Open your computer’s available Wi-Fi list and look for an open, temporary network broadcasted by the speaker itself. It usually looks like GoogleHomeXXXX.b or NestMini.b.
- Connect your laptop directly to that open speaker network.
- Open a web browser and try typing in
192.168.1.1(or click on the Google Chrome options menu and choose “Cast”). - This creates a manual bridge that allows you to input your home Wi-Fi details directly into the speaker’s memory without touching a smartphone app.
Quick Wrap-Up Checklist
To make sure you don’t hit any walls, keep this simple fix-it table in mind while fixing your connection:
| The Problem You Are Facing | The Quickest Human Fix |
| Typo in the network password | Double-check your capital letters and numbers. |
| Router combining 2.4GHz and 5GHz lanes | Separate the bands in your router or temporarily disable 5GHz. |
| Security blockers on your smartphone | Turn off all active VPNs and temporarily disable Mobile Data. |
| iPhone app won’t search properly | Go to iPhone Settings > Google Home > Turn on “Local Network”. |
Learning how to connect Google Home to WiFi doesn’t have to be a frustrating experience. Just clear out your phone’s permission blocks, keep your phone close to the device during setup, and keep an eye on your router’s dual-band settings. Your Google Assistant will be back to playing music and answering commands in no time!
Frequently Asked Questions (FAQs)
Question 1: Why won’t my Google Home connect to Wi-Fi?
Answer: Most connection failures happen due to simple mistakes like a mistyped password, disabled Bluetooth or Local Network permissions on your phone, or your router confusing the speaker by forcing it onto a 5GHz network lane instead of 2.4GHz.
Question 2: Can Google Home connect to a 5GHz Wi-Fi network?
Answer: Yes, many modern Google Home and Nest models do support 5GHz. However, during the initial setup phase, they are highly sensitive and usually connect much more reliably if your smartphone is locked onto a 2.4GHz frequency.
Question 3: Do I absolutely need Bluetooth enabled during the setup?
Answer Yes. The Google Home app uses your phone’s Bluetooth radio to physically discover and handshake with the speaker when it is sitting in setup mode. Once the Wi-Fi credentials are sent, Bluetooth is no longer required.
If you need any more help about your problems you can visit our website and also get help to solve many problems.