Uninstall OneDrive Windows 11: 3 Safe Ways (No Data Lost)
You are not the only one who is tired of OneDrive sitting in your system tray or sending you annoying “storage-full” notifications. Windows users often prefer local storage, and want to remove onedrive in order to eliminate background sync and stop unnecessary distractions.
OneDrive removal is not as easy as uninstalling an app. Microsoft has deeply integrated OneDrive in Windows 11, particularly inside important folders such as Desktop, Documents and Pictures. Many users are confused when trying uninstall Onedrive and fear losing important files.
There are safe and secure ways to deal with it. This guide will teach you 3 effective methods based on your needs. These include temporarily disabling OneDrive or pausing syncing. You will learn how to remove onedrive without risking any of your data.
Uninstall vs Disable OneDrive: Which One Do You Need?
Before you proceed, it helps to know the difference. Disabling OneDrive stops it from syncing files but keeps the app installed for future use. Uninstalling removes the app completely from Windows 11, including its background processes and File Explorer integration. If you only want to pause syncing temporarily, disabling is enough. If you want OneDrive gone for good, follow the uninstall methods below.
How do I permanently stop OneDrive from running on Windows 11?
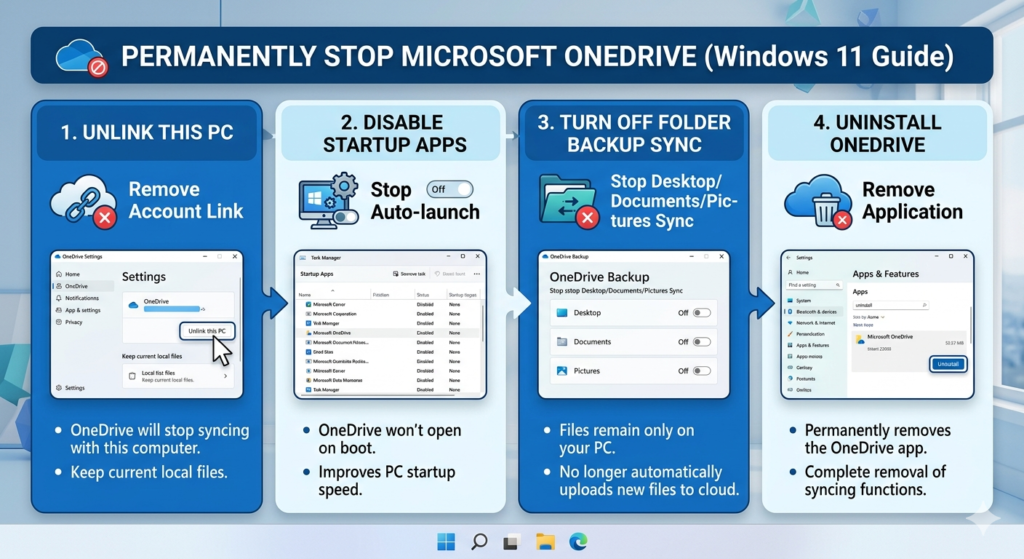
Follow these steps to stop OneDrive and uninstall it completely.
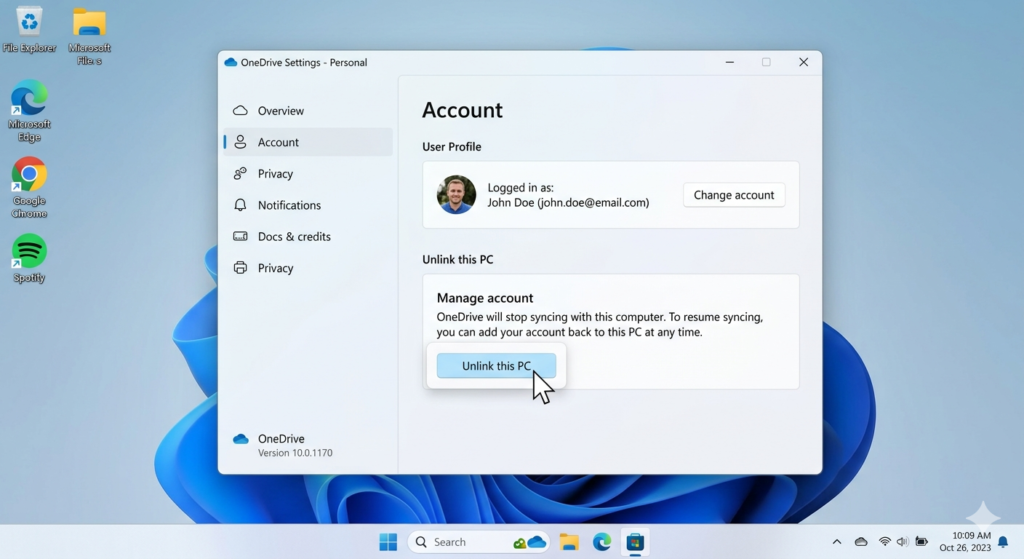
- Disconnect your PC from OneDrive. Go to OneDrive Settings – Account and click Unlink This PC.
- Disable OneDrive from Startup Apps: Press Ctrl + Shift + Esc – Open Startup Apps – Disable Microsoft OneDrive.
- Turn off Folder Backup Synchronization: Open OneDrive Settings – Sync and Backup – Turn the backup option for Desktop Documents and Pictures.
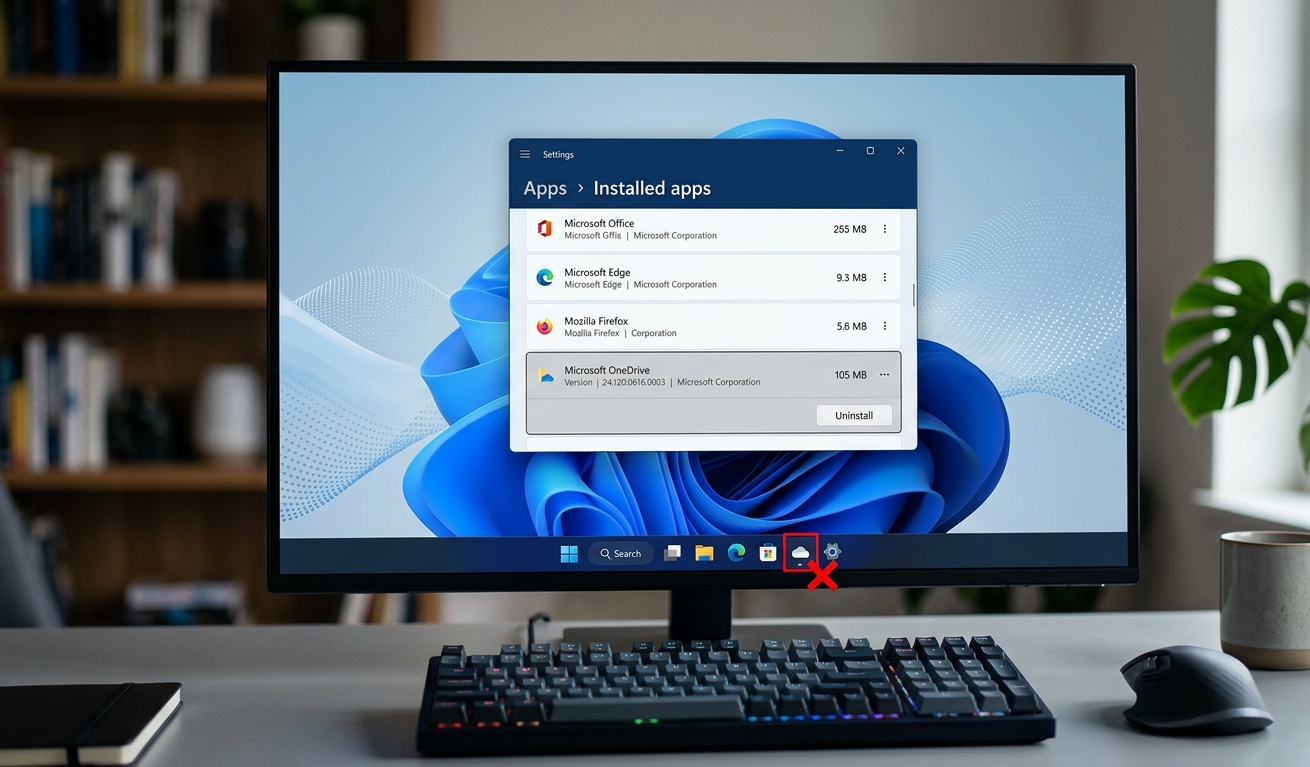
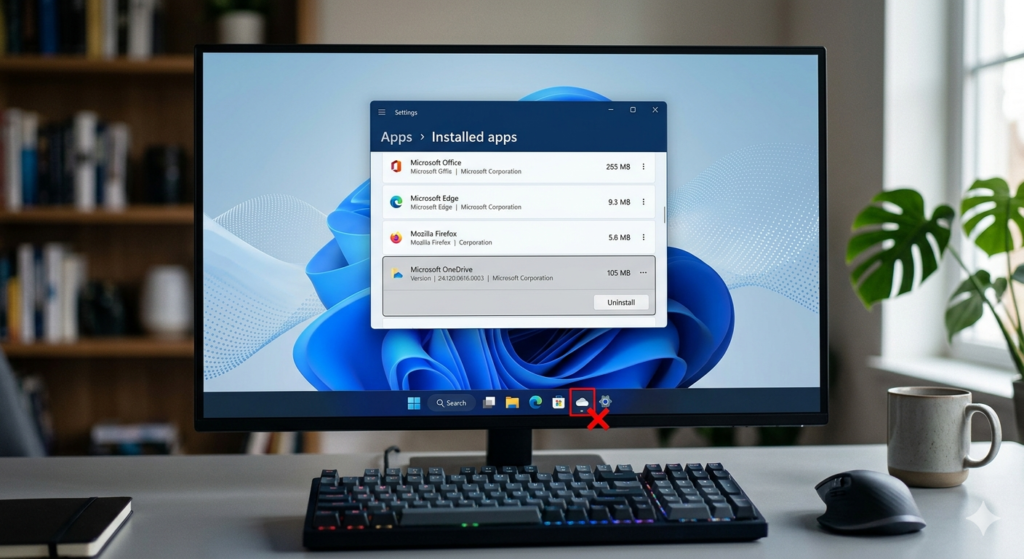
- Run Default Windows Uninstaller Open Apps > Installed Apps > Microsoft OneDrive Apps > Uninstall.
These four steps will stop OneDrive from syncing permanently and remove it completely from your Windows 11 computer.
OneDrive constantly syncing files in the background can quietly increase CPU load over time. If your laptop has been running warmer than usual, our guide on how to check CPU temp on Windows 11 shows you how to monitor and diagnose the real cause.
Method 1: How to Disable OneDrive Without Deleting Local Files
Some users do not want to remove OneDrive completely. Some users want to stop background sync while still keeping their files on the computer. This method will allow you to fix sync problems without having to completely uninstall Onedrive.
Step by step instructions to unlink your account from Settings
Unlinking from your Microsoft account will stop OneDrive from syncing your files to the cloud, while still keeping your local files on your PC.
Step 1:Open OneDrive settings
- Click on the OneDrive Cloud icon at the bottom right of the taskbar.
- Select the gear (Settings icon) .
Step 2: Access your account settings
- Click on the Account Tab.
- Click on Unlink This PC.
Step 3: Confirm your Action
Windows will ask you to confirm. Windows will ask for confirmation.
- Cloud syncing is stopped immediately.
- The files that you have already saved on your local computer are still safe.
- The automatic synchronization of new files is disabled.
This is the easiest way to stop OneDrive, without having to completely uninstall onedrive.
This method is effective
Most users want to be free from the constant notifications. Unlinking your account will remove the connection and not affect personal documents.
Disabling OneDrive in the Windows 11 Startup Apps List
OneDrive can still start automatically at startup even after being unlinked. Disabling startup improves boot performance by preventing unnecessary background processes.
Step 1: Open Task manager
Press:
Ctrl + Shift + EscOpens Windows Task Manager immediately.
Open Startup Apps
- Click Startup Applications in the left panel.
- Find Microsoft OneDrive.
Step 3: Disable startup
- Right-click Microsoft OneDrive
- Select Disable
That’s it. OneDrive won’t launch automatically every time Windows launches.
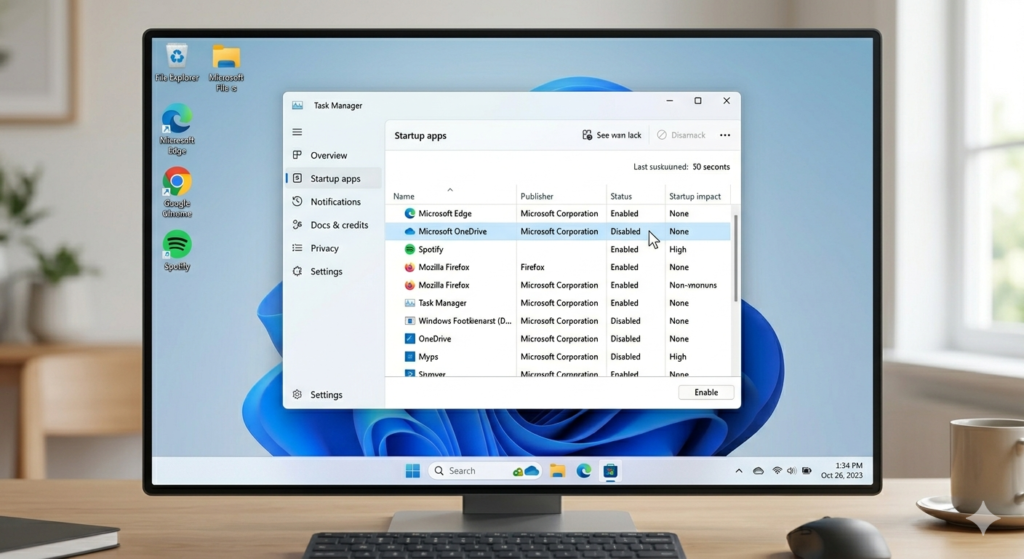
Why disable startup?
OneDrive background service is often stopped by users to improve boot speed. Disabling OneDrive can improve Windows performance, particularly on older computers, since it consumes network and RAM resources.
This method is best used if you’re not sure whether you want to uninstall onedrive completely or just reduce its activity.
Method 2: Completely uninstall OneDrive in Windows 11
This method is perfect if you want to completely remove Microsoft Cloud Storage. Uninstall Onedrive Permanently can reduce background activity and sync notifications. It will also simplify Windows.
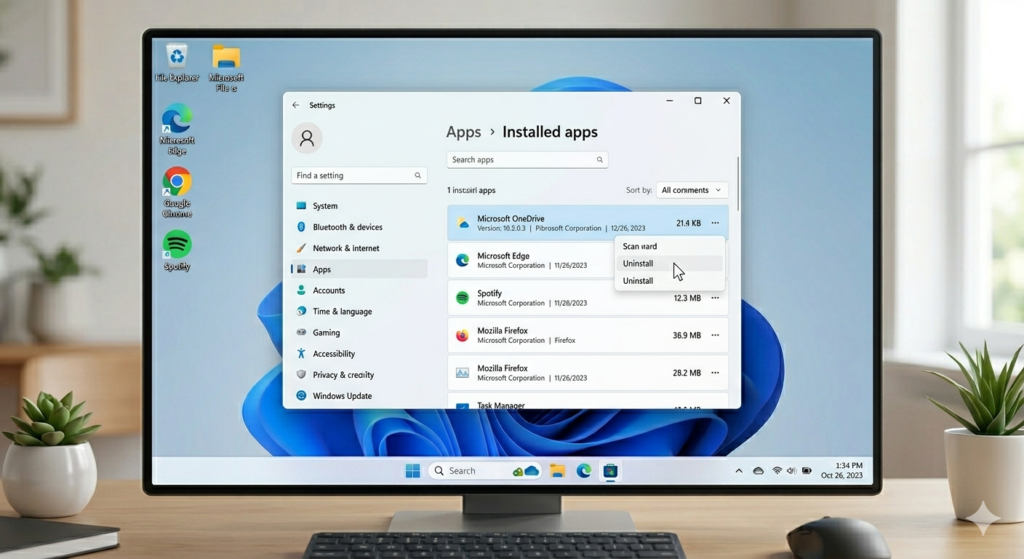
Make sure that you have downloaded all important files from OneDrive to your computer before proceeding. It will prevent any confusion about whether files are stored in the cloud or locally.
Please Read This Before Removing OneDrive
Open your OneDrive directory and check that your files are accessible offline. Download the file if it has a cloud icon next to it before uninstalling onedrive.
Uninstalling Onedrive using the Windows Default Apps Panel
It is the safest and easiest method for Windows 11 users.
Open Windows Settings
Press:
Windows + IThe Windows Settings menu will be opened instantly.
Step 2: Click on Installed Apps
Take this route:
Apps – Installed Apps
Use the search bar or scroll down to find it.
Step 3: Locate Microsoft OneDrive
Type:
OneDrive
You’ll see Microsoft OneDrive in the list.
Click on Uninstall to complete the process.
- Click on the three dot menu
- Select Uninstall
- Windows will ask you to confirm your confirmation.
Windows will begin to remove OneDrive from your computer.
What happens after removal?
After you uninstall onedrive after you uninstall, a few things will happen.
- The synchronization stops forever
- The OneDrive icon is missing from the taskbar
- Start-up processes are stopped automatically
- Downloaded local files remain on your PC
If you have not downloaded the files, they may not appear.
Why many users prefer this method
It is the most secure method, as it uses Microsoft’s removal system. This takes less than 2 minutes and does not require any technical knowledge.
This is the most common way for everyday users to uninstall onedrive.
If your system still feels sluggish even after removing OneDrive, background apps and startup programs may still be slowing things down. Our guide on Windows 11 slow performance fixes covers seven practical steps to restore speed without resetting your PC.
Force a Clean Remove via Command Prompt/CMD
OneDrive can sometimes refuse to uninstall correctly. It’s possible to see leftover files or errors after updating the app.
You can use Command Prompt to force a complete uninstall in these cases.
Step 1: Open Command Prompt in Administrator mode
- Click on the Start menu
- Type CMD
- Click to Command Prompt
- Choose Run as Administrator
Step 2: Stop OneDrive
Copy and paste the following command:
taskkill OneDrive.exe /fEnter by pressing.
OneDrive will be closed by force.
Step 3: Run Correct Uninstall Command
For 64-bit Windows 11, use:
%SystemRoot%\SysWOW64\OneDriveSetup.exe /uninstallFor 32-bit systems, use:
%SystemRoot%\System32\OneDriveSetup.exe /uninstallAfter pasting, press Enter.
Windows will silently remove OneDrive from the background.
Step 4: Remove Leftover Files (Optional)
After uninstalling onedrive, you may find that some folders are still left behind.
If these locations exist, you can delete them manually:
C:\Users\YourUsername\OneDrive C:\ProgramData\Microsoft OneDrive C:\Program Files\Microsoft OneDriveReplace YourUsername by your Windows username.
Why use CMD removal?
It is best to use the Command Prompt when:
- OneDrive won’t uninstall normally
- Uninstall button missing
- Sync errors continue after removal
- You need a cleaner uninstall procedure
CMD can be used to uninstall onedrive completely from Windows 11 if the installation is stubborn.
On the other hand you can free use free deepseek for solwing this problems.
Method 3. Group policy tweak to block OneDrive permanently (advanced users)
Some users don’t want OneDrive to return after Windows updates. Group Policy is a better way to permanently block Microsoft cloud sync in this case.
This method is for advanced users that want to control Windows behavior completely.
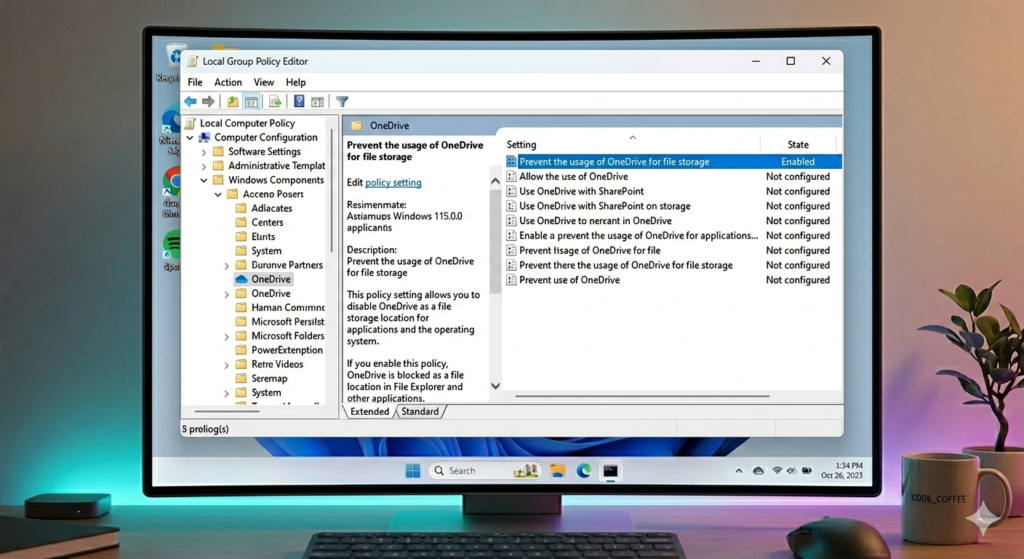
Navigation to the Hidden Cloud Storage Registry & Policy Folders
Open the Local Group Policy Editor
Press:
Windows +RType:
gpedit.mscPress and enter.
Step 2: Navigate OneDrive policies
Take this route carefully:
Configuration of the Computer - Administrative templates - Windows ComponentsStep 3: Enable Blocking Policy
Double-click:
How to prevent OneDrive from being used as a file storage
Choose:
Enabled
Click here to continue.
Apply – OK
What this Policy Does
Once enabled:
- OneDrive sync stops working permanently
- Windows does not automatically reconnect to the network
- Cloud Backup Integration is disabled
- It is less likely that future updates will restore it
This method is very useful for users that have already decided to remove onedrive from their computer and do not want it back.
Alternative Registry Method (Advanced).
You can also block OneDrive if your Windows version doesn’t include Group Policy Editor.
Most Windows 11 Pro users, however, will find Group Policy to be easier and safer.
Remove Leftover Registry Entries
After uninstalling OneDrive through Command Prompt or Settings, a few registry entries and context menu references can remain behind. To remove them, press Windows plus R, type regedit, and press Enter. Navigate to HKEY_CLASSES_ROOT then CLSID then the key named 018D5C66-4533-4307-9B53-224DE2ED1FE6, right click it and select Delete. Then navigate to HKEY_CLASSES_ROOT then Wow6432Node then CLSID and delete the same key there if it exists. Close Registry Editor and restart your computer.
Always back up the registry before editing it. Go to File then Export in Registry Editor to save a backup copy first.
If you are comfortable editing the registry to remove leftover OneDrive entries, you might also want to simplify your sign in process. Our Windows 11 automatic login guide walks through the safest way to skip the password screen using the same Registry Editor tool.
OneDrive Keeps Reinstalling Itself After Removal
This usually happens because of a pending Windows Update or a scheduled task still enabled. Open Task Scheduler, go to the Microsoft folder, then OneDrive, and disable any active tasks named OneDrive Standalone Update Task.
Uninstall Option Is Missing From Settings
If OneDrive does not appear under Apps in Settings, it likely came preinstalled as a system component tied to your Windows edition. Use the Command Prompt method covered above instead, since it removes OneDrive at the system level.
OneDrive Icon Still Shows in File Explorer
This happens when the shell integration was not fully removed. Restart File Explorer through Task Manager, or run the registry cleanup step above to clear the leftover entries
Files Disappeared After Uninstalling OneDrive
Your files are not deleted, they are moved back to a local backup folder. Check the OneDrive folder inside your user account to confirm your files are still there before uninstalling, then move them to a folder outside OneDrive first.
Frequently Answered Questions
1. How do I uninstall Onedrive?
Answer:
To uninstall onedrive, open:
Settings Apps Installed Apps Microsoft OneDrive Uninstall
If the uninstaller does not work, you can remove it using Command Prompt.
2. How do I uninstall Onedrive from Windows 11?
On Windows 11 the easiest way to remove onedrive through the Installed Apps Panel.
Click here to visit:
Apps – Installed Apps
Click the three-dot icon and choose Uninstall.
3. Can I delete local files by uninstalling OneDrive?
No. Uninstalling OneDrive won’t delete any files that you have already saved on your computer.
After removal, files stored only in the cloud that have never been downloaded will be rendered inaccessible. Before removing OneDrive, make sure that important files have been synced off-line.
4. What if I decide to cancel my OneDrive subscription?
If you cancel your OneDrive subscription, your account automatically reverts to the free 5 GB storage plan. Any files stored above that limit are not deleted, but they become read only until you either renew your subscription or remove enough files to fit within the free quota.
5.Is it safe to permanently remove OneDrive from Windows 11?
Yes, uninstalling OneDrive is safe and does not affect other Windows features. Your local files remain untouched as long as they are not stored exclusively in the OneDrive folder.
6.Does uninstalling OneDrive delete my cloud files?
No, uninstalling OneDrive only removes the app from your PC. Your files remain safely stored in your Microsoft cloud account and can be accessed anytime through the OneDrive website.
7.Can I stop OneDrive from syncing without uninstalling it?
Yes, right click the OneDrive icon in the system tray, select Settings, then Account, and choose Unlink this PC. This pauses syncing while keeping the app installed.
8.Why does OneDrive keep coming back after I uninstall it?
This is often caused by a Windows Update reinstalling it automatically, or a scheduled task that was not disabled. Disabling the related task in Task Scheduler usually stops this permanently.
Removing OneDrive is just one part of keeping Windows 11 lightweight and fast. If you want to go further and strip out unnecessary background apps, telemetry, and startup programs, check our complete Windows 11 Debloater guide for safe, tested methods that free up RAM and speed up boot time.
Final Thoughts
There are several ways you can safely remove Microsoft cloud services. can be uninstalled by most users through Windows settings. Advanced users, however, may prefer Command Prompt and Group Policy to achieve a permanent solution.
It is important to note that removing OneDrive will not automatically delete local files. You can uninstall OneDrive safely as long as you have downloaded your important documents first.
This guide will help you decide which method is best for you, depending on whether you need a temporary disable, account unlinking or a full removal from Windows 11
If you need any more help you can visit our website smarttechfixer.com
And Uninstalling OneDrive is a great step, but if you want to completely clean your PC, check out our ultimate guide on Windows 11 Debloater to speed up your system.”