How to Dual Boot Ubuntu with Windows 11 safely is one of the biggest concerns for beginners. Many people want to try Ubuntu Linux but feel scared that installing it might delete Windows, break their laptop, or remove important files.
The good news? That does not happen if you follow the right method.
In this guide, I will show you the safest and easiest way to install Ubuntu alongside Windows 11 step by step. You do not need advanced computer knowledge. Even if this is your first time trying Linux, you can follow this guide without stress.
Most importantly, your Windows files, apps, and documents will stay safe.
By the end of this guide, you will have a working dual boot Windows 11 and Ubuntu safely setup where you can switch between both operating systems anytime.
Why Dual Boot Ubuntu With Windows 11?
Before we begin, let’s answer a common question.
Why install Ubuntu instead of replacing Windows?
A dual boot setup gives you the best of both worlds.
You can use:
- Windows 11 for gaming, Microsoft Office, and software
- Ubuntu Linux for coding, privacy, development, and faster performance
Every time your PC starts, you can choose which operating system to open.
This means you can test Linux without deleting Windows.
Things You Need Before Starting
Before learning How to Dual Boot Ubuntu with Windows 11, make sure you have these things ready.
Requirements Checklist
- A Windows 11 computer
- Minimum 30GB free storage space
- 8GB or larger USB drive
- Stable internet connection
- Important files backed up
- Laptop charger connected during installation
Backup Your Important Files
Let’s be honest.
Dual booting is usually safe, but mistakes can happen if someone clicks the wrong option during setup.
That is why backing up your important files is always smart.
You can save files to:
- Google Drive
- OneDrive
- External hard drive
- USB storage
This simple step gives peace of mind.
Step 1: Check If Your PC Uses UEFI Mode
Many competitors skip this step, but it is very important.
Windows 11 mostly runs on UEFI mode, and Ubuntu should use the same boot mode for proper installation.
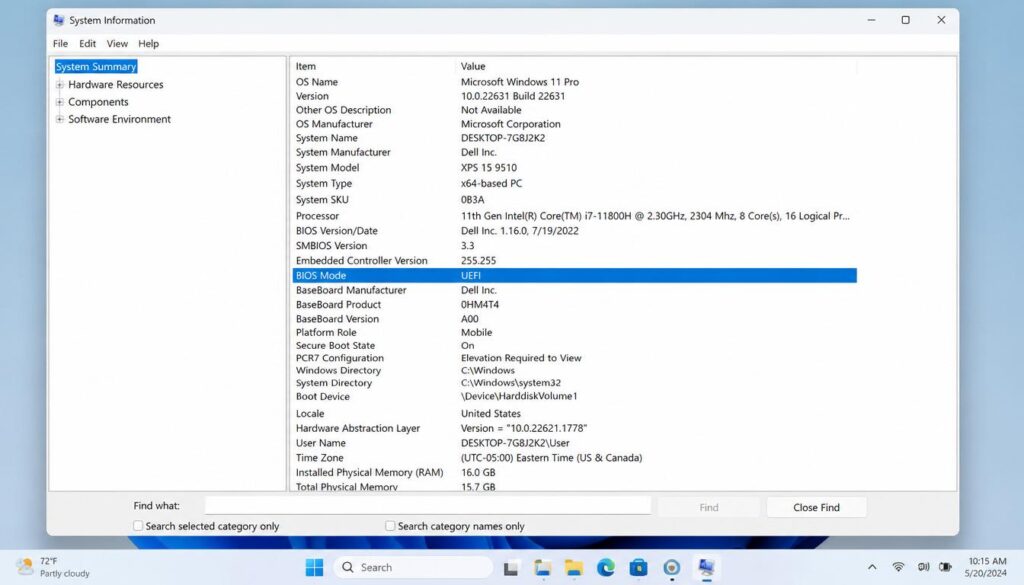
How to Check BIOS Mode in Windows 11
- Press Windows + R
- Type msinfo32
- Press Enter
- Look for BIOS Mode
If it says:
UEFI → You are good to go.
If it says:
Legacy → Installation may need extra changes.
Most Windows 11 PCs already use UEFI, so you usually do not need to worry.
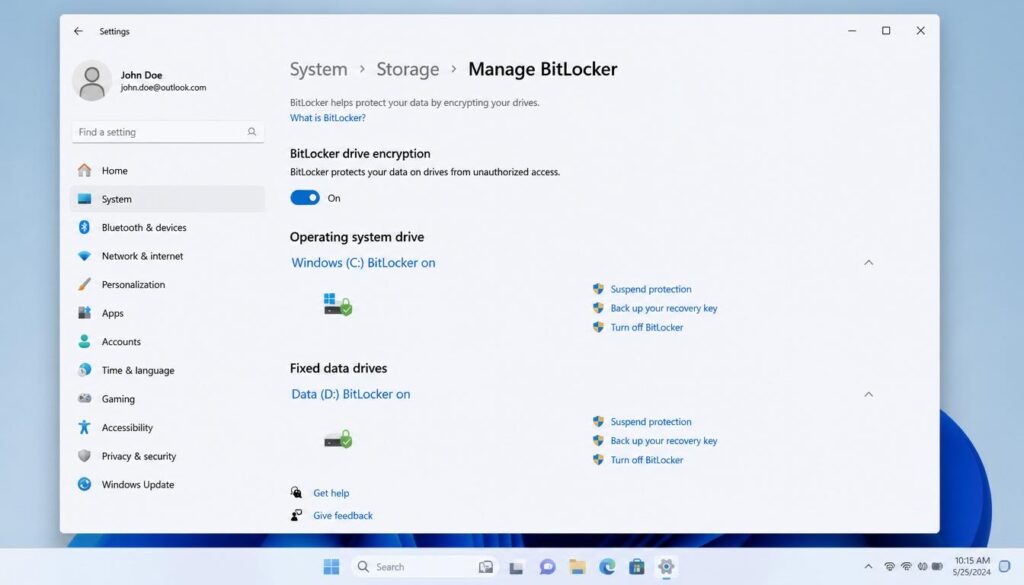
Step 2: Turn Off BitLocker Encryption (Important)
This is a step many websites forget to explain.
Some Windows 11 laptops have BitLocker encryption enabled by default.
If BitLocker stays active, it can sometimes cause boot problems after installing Ubuntu.
How to Check BitLocker
- Search Manage BitLocker in Windows search
- Open it
- Check if BitLocker is On
If enabled:
Click Suspend Protection before continuing.
Do not worry.
Your files stay safe.
You can turn BitLocker back on after Ubuntu installation.
How to Dual Boot Ubuntu with Windows 11
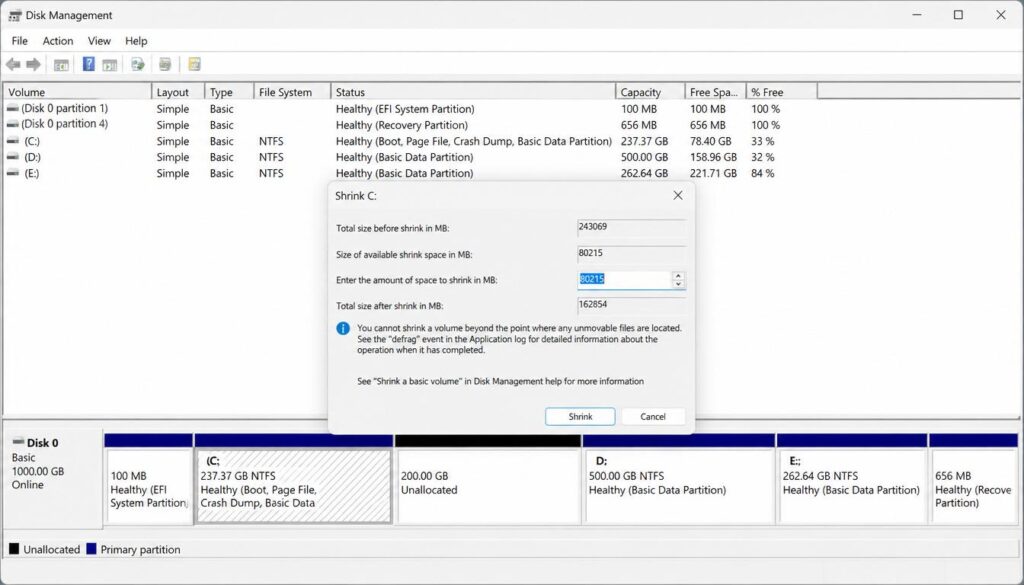
Step 3: Shrink Partition in Windows 11
Now we need free space for Ubuntu.
We will create something called Unallocated Space.
Do not panic.
This does not delete Windows.
This step is part of windows 11 disk partitioning for linux.
Open Disk Management
- Press Windows + X
- Click Disk Management
Wait a few seconds for drives to load.
Shrink Your Main Drive
Usually, this is the C Drive.
- Right-click C Drive
- Select Shrink Volume
- Enter storage amount for Ubuntu
How to Dual Boot Ubuntu with Windows 11
How Much Space Should You Give Ubuntu?
Recommended:
- 30GB minimum
- 50GB better
- 100GB best for apps and files
Example:
- 30000 MB = 30GB
- 50000 MB = 50GB
Now click Shrink.
You will see a black section called:
Unallocated Space
Important:
Do NOT create a new partition here.
Leave it empty.
Ubuntu will automatically use this space later.
This is one of the most important parts of How to Dual Boot Ubuntu with Windows 11.
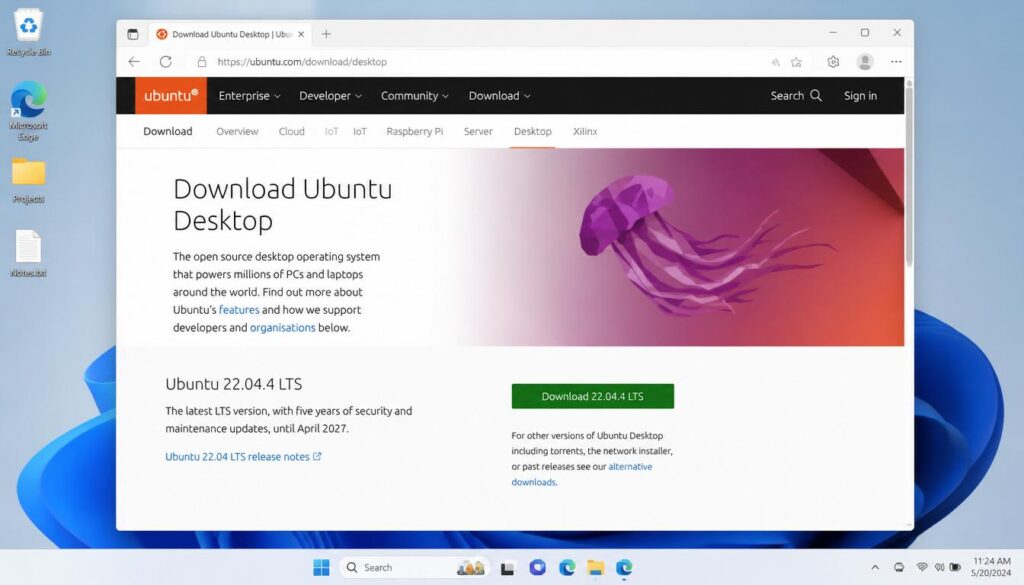
Step 4: Download Ubuntu ISO File
Now download Ubuntu.
Always use the latest Ubuntu LTS (Long-Term Support) version because it is more stable and beginner-friendly.
Save the file somewhere easy to find like Desktop or Downloads.
How to Dual Boot Ubuntu with Windows 11
Step 5: Create Ubuntu Bootable USB
Now we will create ubuntu bootable usb using a free tool called Rufus.
Install Rufus
Download and open Rufus.
Then:
- Plug in your 8GB USB
- Select your USB drive
- Click Select
- Choose Ubuntu ISO file
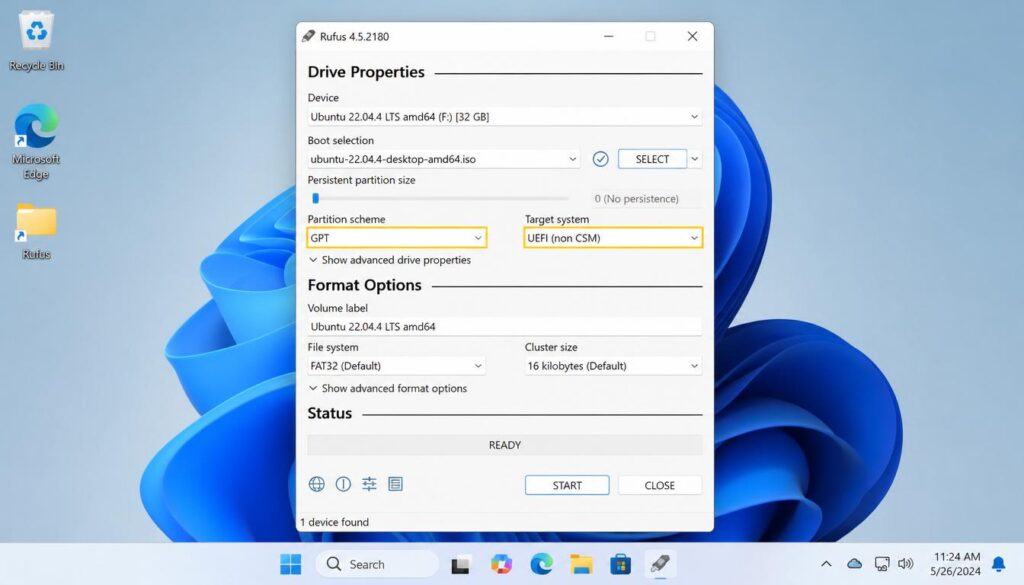
Correct Rufus Settings for Windows 11
This part matters a lot.
Set:
- Partition Scheme: GPT
- Target System: UEFI (non-CSM)
Why?
Because Windows 11 uses modern UEFI boot mode.
Wrong settings can cause Ubuntu not to boot properly.
After selecting settings:
Click Start
Wait a few minutes.
Done.
You successfully create ubuntu bootable usb for installation.
Step 6: Disable Fast Startup in Windows 11
Many people skip this step and later face boot problems.
Fast Startup sometimes stops Ubuntu from reading Windows properly.
Turn Off Fast Startup
- Open Control Panel
- Go to Hardware and Sound
- Open Power Options
- Click Choose what the power buttons do
- Select Change settings currently unavailable
- Uncheck:
Turn on Fast Startup
- Click Save Changes
Easy.
Step 7: Disable Secure Boot in BIOS
For many systems, Ubuntu works better with Secure Boot disabled.
Enter BIOS/UEFI Settings
Restart your PC.
Press one of these keys:
- F2
- Delete
- F10
- F12
(Depends on laptop brand.)
Inside BIOS:
- Find Secure Boot
- Change it to Disabled
- Save changes
Restart PC.
This helps Ubuntu’s GRUB bootloader work properly.
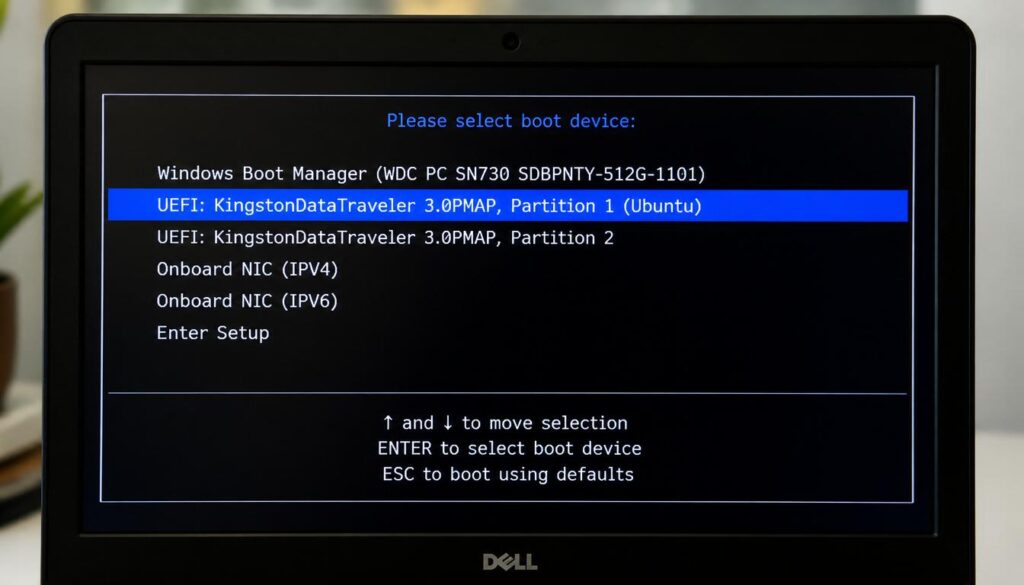
Step 8: Boot Into Ubuntu USB
Now we are ready for installation.
Open Boot Menu
Restart your computer.
Press:
- F12
- ESC
- F9
Choose your USB drive.
Ubuntu screen will appear.
Click:
Try or Install Ubuntu
Then click:
Install Ubuntu
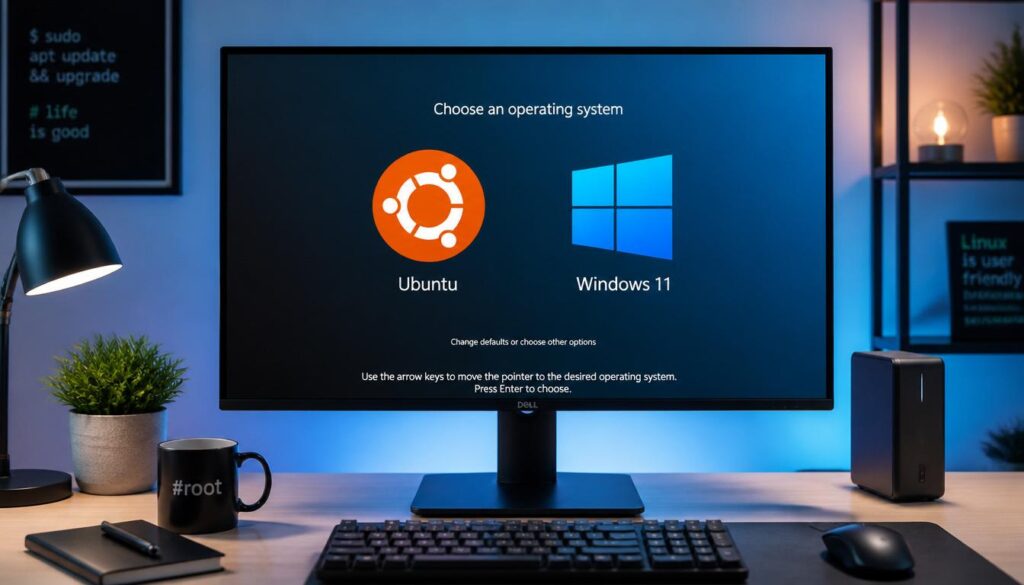
Step 9: Install Ubuntu Alongside Windows 11
This is the most important step.
Read carefully.
During setup, Ubuntu will show installation options.
You must select:
Install Ubuntu alongside Windows Boot Manager
This is the safest option.
It keeps Windows safe and installs Ubuntu in empty space.
Never Choose This Option
Avoid:
Erase Disk and Install Ubuntu
If you click this:
Windows gets deleted.
Everything is removed.
That is why beginners must stay careful here.
This step makes install ubuntu alongside windows 11 completely safe.
Step 10: Finish Ubuntu Setup
Now Ubuntu asks basic questions.
Choose:
- Language
- Region
- Keyboard layout
- Username
- Password
Then click:
Install Now
Wait around 10–20 minutes.
Once finished:
Restart computer.
Remove USB drive.
Done.
You have successfully learned How to Dual Boot Ubuntu with Windows 11.
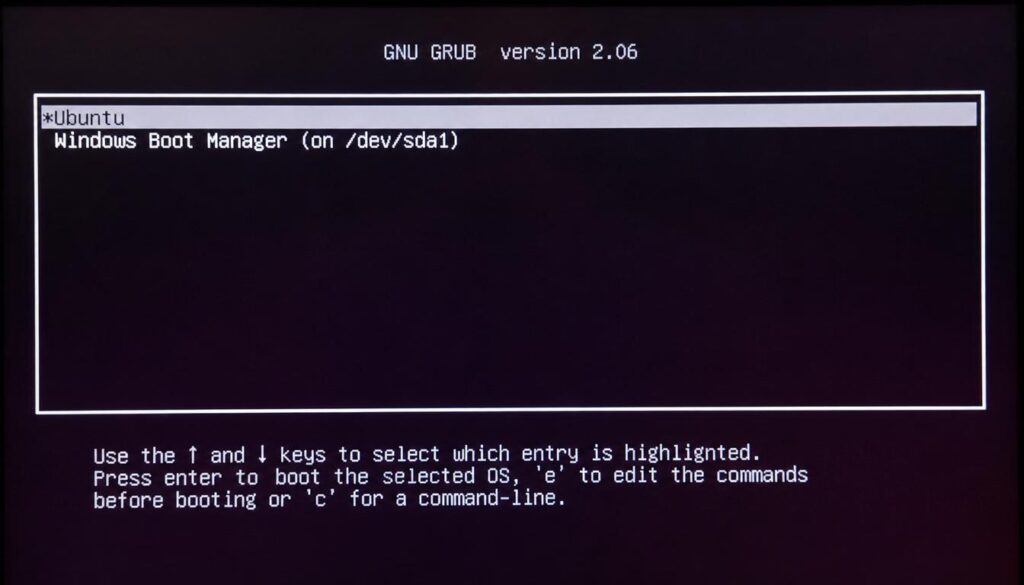
How to Switch Between Ubuntu and Windows 11
After restarting, you will see:
GRUB Boot Menu
This lets you choose:
- Ubuntu
- Windows Boot Manager
Want Ubuntu?
Click Ubuntu.
Want Windows?
Click Windows 11.
Simple.
This is why many users prefer to dual boot windows 11 and ubuntu safely instead of deleting Windows completely.
Common Problems and Fixes
Ubuntu Not Showing in Boot Menu?
Try this:
- Restart PC
- Open BIOS
- Set Ubuntu as first boot option
GRUB Bootloader Missing?
Open BIOS and check:
- UEFI mode enabled
- Secure Boot disabled
Usually, this fixes the issue.
Windows Missing After Installation?
Do not panic.
GRUB sometimes hides Windows.
Restart and check:
Windows Boot Manager
inside BIOS boot options.
Frequently Asked Questions
Will dual booting delete my Windows 11 data?
No.
If you select Install Ubuntu alongside Windows Boot Manager, your files stay safe.
Just avoid the Erase Disk option.
Do I need a separate hard drive to dual boot Ubuntu?
No.
You can install Ubuntu on the same drive using Unallocated Space.
How do I switch back to Windows 11 after installing Ubuntu?
Restart your PC and select Windows Boot Manager from the GRUB boot menu.
Can I remove Ubuntu later?
Yes.
You can delete Ubuntu partitions from Disk Management and restore Windows bootloader later.
Final Thoughts
Now you know How to Dual Boot Ubuntu with Windows 11 without losing your files.
The process may look scary at first, but if you follow every step carefully, it is actually simple. Just remember the biggest rule:
Always choose:
Install Ubuntu alongside Windows Boot Manager
and never click:
Erase Disk
That one choice protects your Windows data.
If you face any boot error, partition issue, or installation problem, leave a comment below and we will help you fix it quickly.
If you need any more help you can visit our website and if you wants to speed up your laptop and PC then you can read our this pillar post.