
How to Change File Type in Windows 11?
You tried to open a file and Windows gave you a blank stare. Or maybe you need to send a document in a different format and have no idea where to start. Whatever the situation, figuring out how to change file type Windows 11 should not take you more than five minutes and after reading this guide, it will not.
⚡ Quick Answer
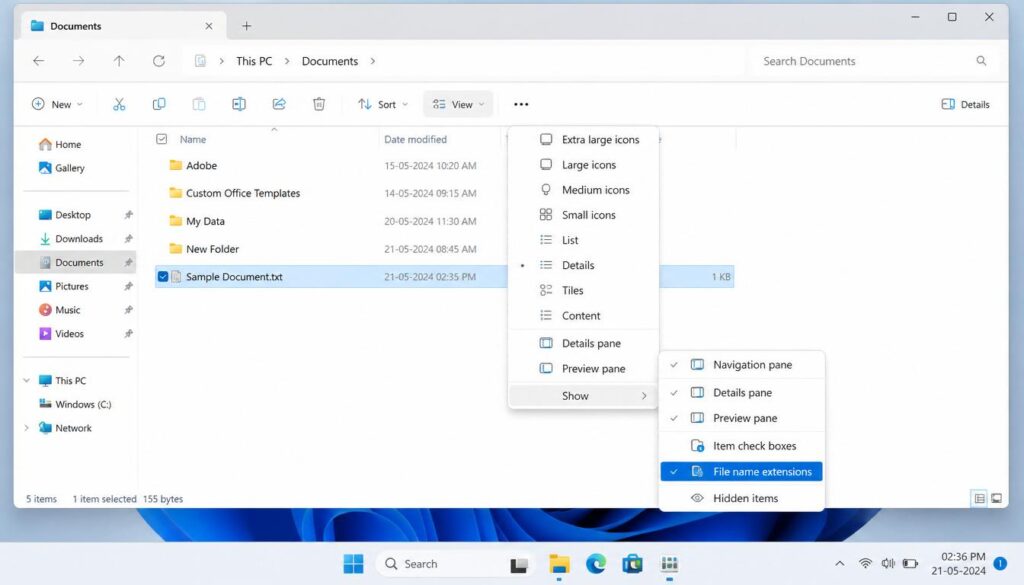
To change a file type in Windows 11, first enable file extensions by going to File Explorer → View → Show → File name extensions. Then right-click the file, select Rename, delete the old extension (like.txt), type the new one (like.csv), and press Enter. Confirm the warning prompt and you are done.
Whether you need to rename a single file or bulk rename hundreds of files at once using Command Prompt or PowerShell, this guide covers every method in full detail. Windows 11 is full of hidden file management tricks just like the tips covered in our complete Windows 11 debloater guide that helps you take full control of your system. You will also find a troubleshooting section at the end for common problems that competitors completely ignore.
Method 1: How to Change File Type Windows 11 Using File Explorer (Easiest Way)
This is the standard method that works for most users in everyday situations. Before you can rename any file extension, you need to make the extensions visible because Windows 11 hides them by default.
Step 1: Enable File Name Extensions in Windows 11
By default, Windows 11 uses a setting called “hide extensions for known file types” which makes all file extensions invisible in File Explorer. You must turn this off first.
1. Open File Explorer (press Windows + E)
2. Click the View tab in the top menu bar
3. Hover over Show
4. Click File name extensions to enable it
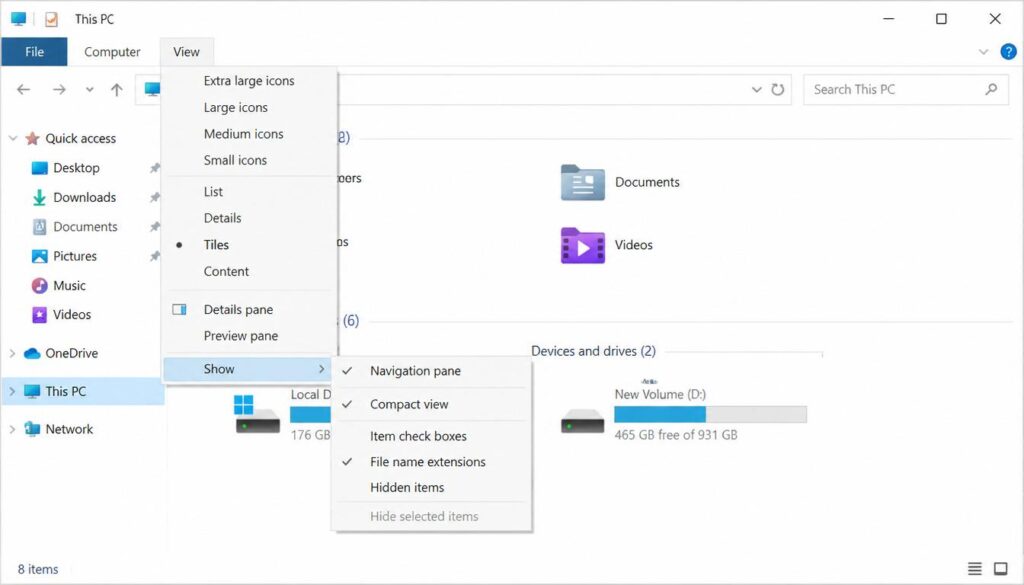
Once you do this, every file in File Explorer will now show its full name including the extension for example, document.docx or photo.jpg.
Step 2: Rename the File Extension
Now that you can see the extensions, follow these steps to change the file type:
- Right-click on the file you want to change
- Select Rename from the context menu (or press F2)
- The full file name including the extension will become editable
- Delete the old extension and type the new one for example, change
.txtto.htmlor.jpgto.png - Press Enter
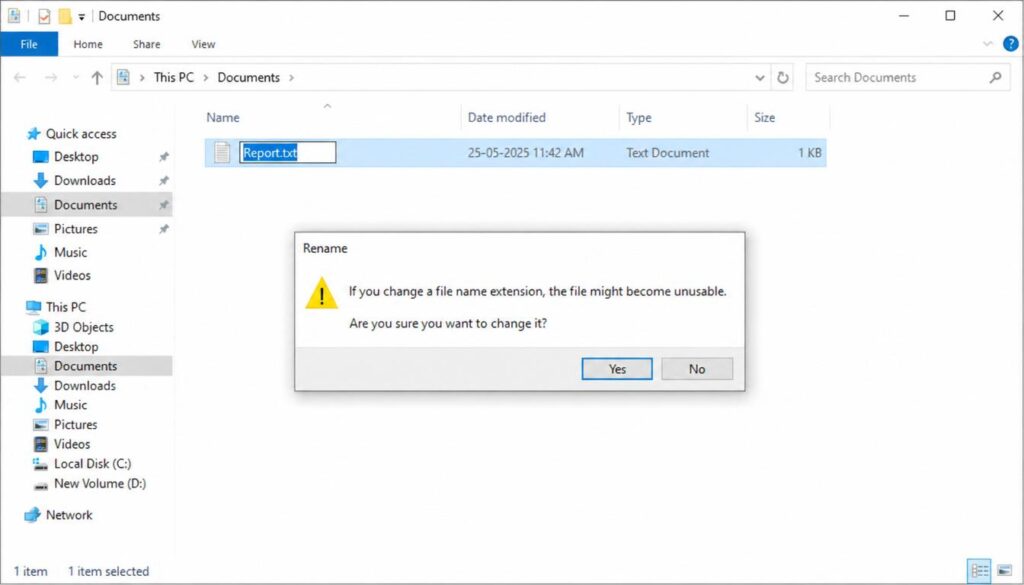
- A warning box will appear asking If you change a file name extension, the file might become unusable click Yes to confirm
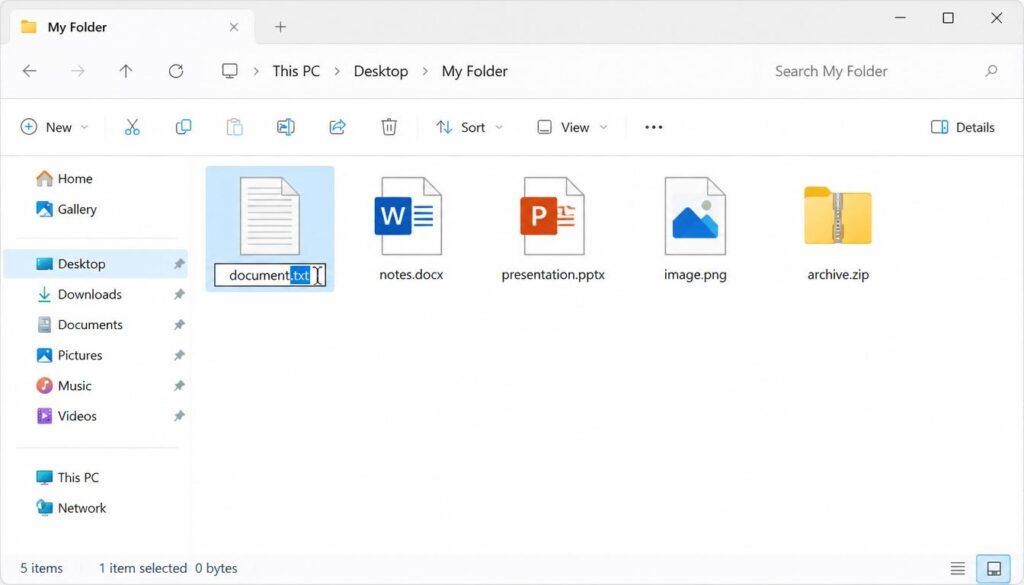
That is the complete process for how to change file type Windows 11 the simple way.
Important Warning: Extension Change Is Not File Conversion
This is the part that most Windows 11 guides skip entirely, and it causes a lot of user frustration. Simply renaming a file extension does not actually convert the file contents. If you rename audio.mp3 to audio.wav, Windows will attempt to open it as a WAV file but the underlying audio data is still in MP3 format. The file will likely fail to play correctly.
A true file conversion requires software such as Microsoft Word (for document formats), VLC (for audio and video), or an online converter tool. Renaming the extension only works reliably in specific scenarios, such as:
- Changing
.txtto.csvfor simple comma separated data files - Changing
.htmto.htmlfor basic web files - Changing
.jpgto.jpeg(these are the same format with different naming)
Always keep a backup copy of your original file before changing the file extension settings.
Method 2: How to Change File Type Windows 11 Using Command Prompt (CMD) for Bulk Files
This is where most competitors fall short. No one properly explains how to use Command Prompt to bulk rename files yet it is one of the most powerful and time-saving methods available. If you need to rename file extension across dozens or even hundreds of files at once, this is the method for you.
Why Use CMD for Bulk Rename Files?
File Explorer is fine for one file at a time. But if you have a folder with 200 .txt files that all need to become .csv files, renaming them one by one is an enormous waste of time. The Command Prompt ren command handles this instantly. Windows 11 gives you a lot of built-in power tools that most people never use for example, did you know you can also uninstall OneDrive on Windows 11 permanently using just a few command line steps, without losing any of your saved files?
Step 1: Open Command Prompt as Administrator
- Press
Windows + Sto open search - Type cmd
- Right-click Command Prompt and select Run as administrator
- Click Yes in the UAC prompt
Step 2: Navigate to Your Target Folder
Use the cd command to navigate to the folder where your files are stored.
cd C:\Users\YourName\Documents\MyFilesReplace the path with your actual folder location. Press Enter after typing the command.
Step 3: Run the Bulk Rename Command
To rename all files with one extension to another, use this syntax:
ren *.oldextension *.newextensionReal examples:
- Change all
.txtfiles to.csv:
ren *.txt *.csv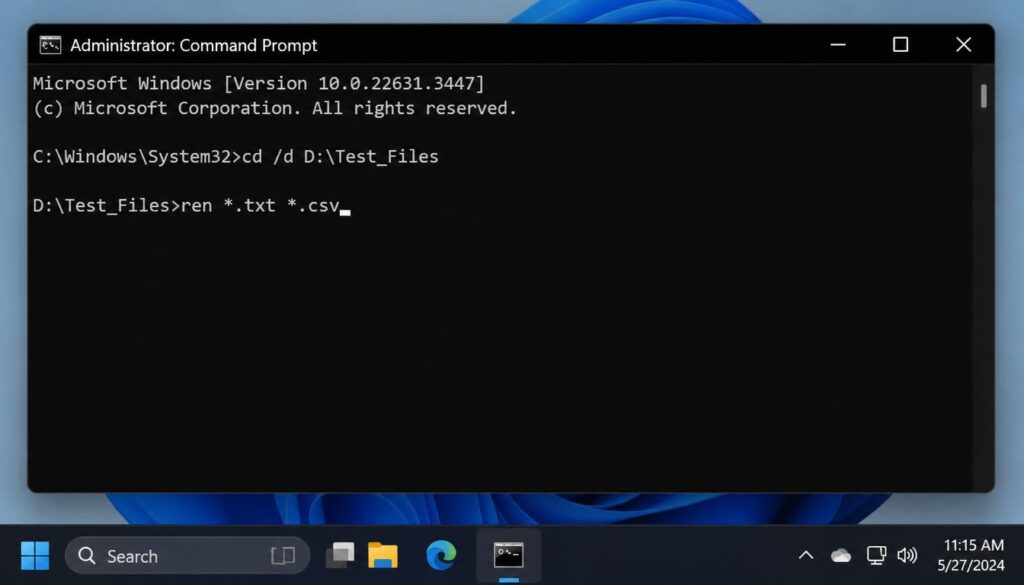
- Change all
.htmfiles to.html:
ren *.jpeg *.jpg- Change all
.htmfiles to.html
ren *.htm *.htmlPress Enter and CMD will instantly rename every matching file in that folder. This is one of the fastest bulk rename files methods available in Windows 11 without any third-party software.
CMD Limitation: Subfolders
The standard ren command only affects files in the current folder it does not go into subfolders. For recursive bulk renaming across nested folders, use PowerShell (Method 3 below).
Method 3: Changing File Types via Windows 11 PowerShell
PowerShell is the most powerful method for advanced users and IT professionals. It gives you full control over bulk rename files operations, including the ability to work through subfolders recursively, apply filters, and handle complex naming patterns. This is a method that almost no competitor article covers in any useful depth.
Step 1: Open PowerShell as Administrator
- Press
Windows + X - Select Windows Terminal (Admin) or PowerShell (Admin)
- Confirm the UAC prompt
Step 2: Navigate to Your Folder
Set-Location "C:\Users\YourName\Documents\MyFiles"Step 3: Rename File Extensions in the Current Folder
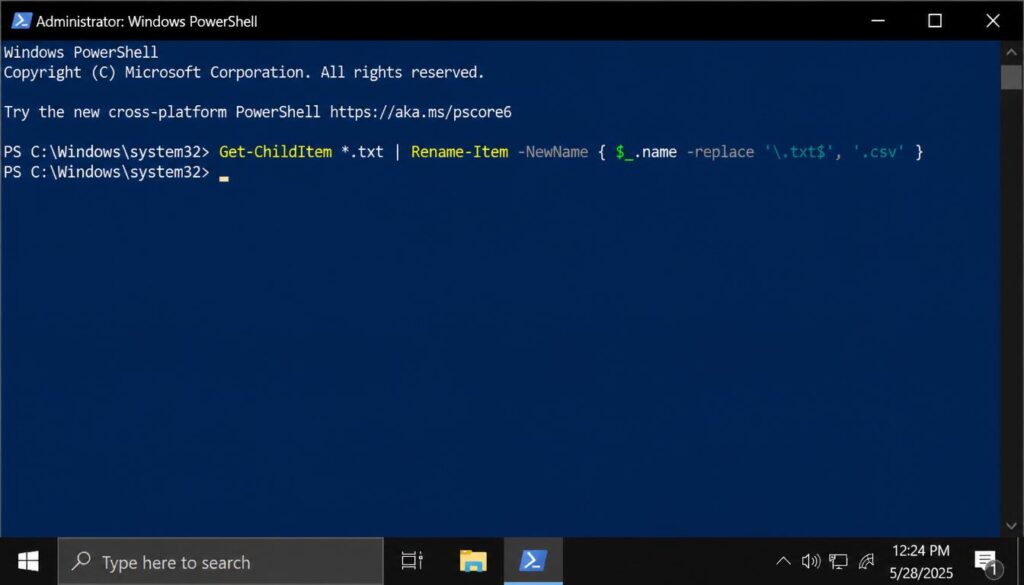
To change all .txt files to .log in the current folder:
Get-ChildItem *.txt | Rename-Item -NewName { $_.name -replace '\.txt$', '.log' }Step 4: Rename File Extensions Recursively (Including Subfolders)
This is where PowerShell truly outshines every other method. To rename extensions across all subfolders:
Get-ChildItem -Path "C:\Users\YourName\Documents\MyFiles" -Recurse -Filter *.txt |
Rename-Item -NewName { $_.name -replace '\.txt$', '.csv' }This single command will find every .txt file inside the target folder AND all of its subfolders, then rename them all to .csv at once. No third-party tool needed.
Step 5: Preview Before Renaming (Safe Practice)
Before running the rename, you can preview what will change without actually making any modifications. Use the WhatIf flag:
Get-ChildItem -Path "C:\Users\YourName\Documents\MyFiles" -Recurse -Filter *.txt |
Rename-Item -NewName { $_.name -replace '\.txt$', '.csv' } -WhatIfPowerShell will show you a list of what it would rename without actually doing anything. This is an excellent habit before running bulk operations.
How to Change File Association Windows 11 (Open a File Type with a Different App)
Changing a file type is one thing but sometimes what you actually need is to change which application opens a certain file type by default. This is called change file association Windows 11, and it is a completely separate process that most guides never explain.
For example, you might want .pdf files to open in your browser instead of Adobe Acrobat, or .mp4 files to open in VLC instead of the Windows Movies app.
Steps to Change File Association in Windows 11
- Press
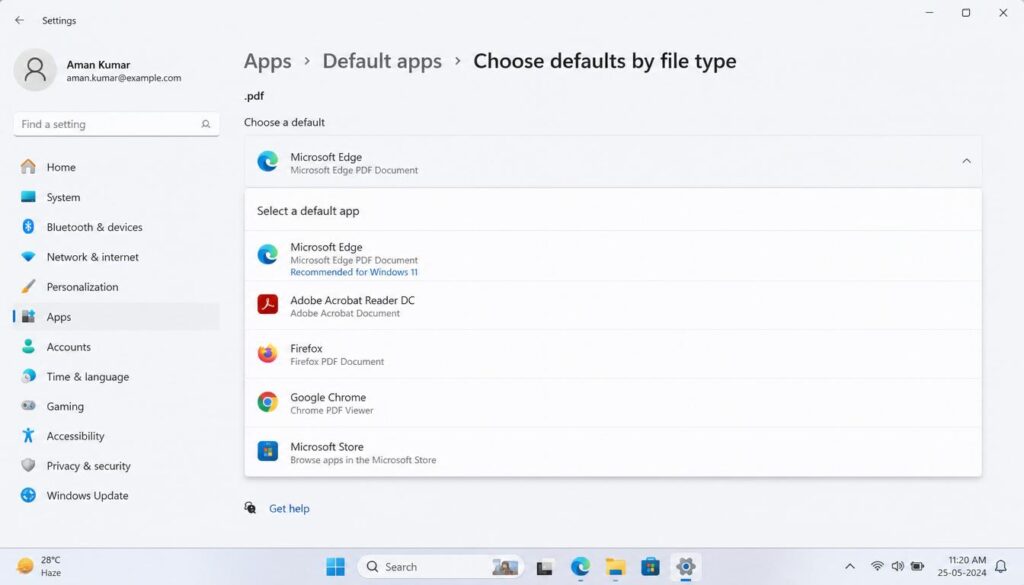
Windows + Ito open Settings - Go to Apps → Default apps
- Scroll down to find the app you want to set as default, OR
- Scroll down and click Choose defaults by file type
- Find the file extension in the list (e.g.,
.pdf) - Click on the current default app shown next to it
- A list of available apps will appear select the one you want
- Click Set default
From that point on, Windows 11 will always open that file type with the app you selected. This is completely separate from renaming a file extension it does not change the file itself, only which program handles it.
Troubleshooting: Common Problems and Fixes
If something went wrong with your file extension change, here is how to fix it. Windows 11 troubleshooting can sometimes feel overwhelming if you have ever dealt with deeper system errors, our guide on fixing the Windows installation has failed error walks through 12 proven solutions that cover the most stubborn Windows 11 problems.
Problem 1: File Became Corrupted or Unreadable After Changing Extension
This is the most common issue users face. You renamed the file, but now it will not open or it opens with garbled content.
Why this happens: As mentioned earlier, changing an extension does not convert the actual file data. If the new extension does not match the real format of the file, no program can read it correctly.
How to fix it:
- Right-click the corrupted file and select Rename
- Change the extension back to its original format (e.g., change
.csvback to.docx) - Press Enter and confirm
- The file should open normally again
If you no longer remember the original extension, right-click the file and select Properties. Under the General tab, look at the Type of file field this may still show the original format.
If you truly need the file in a different format, use a proper conversion tool instead of just renaming the extension:
- Documents: Use Microsoft Word’s “Save As” feature to export in different formats
- Images: Use Paint, GIMP, or an online converter
- Audio/Video: Use VLC, HandBrake, or an online converter
Problem 2: Windows 11 Does Not Show the File Extension Option
If you followed the steps above but the File name extensions toggle is missing or does not work, your system settings may be locked.
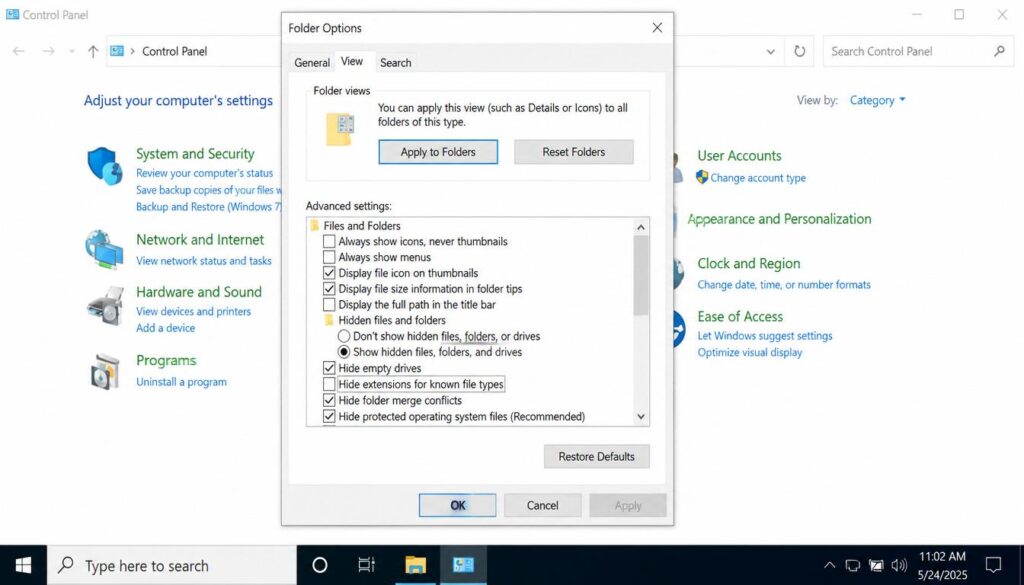
Fix 1: Check Folder Options via the Control Panel
- Press
Windows + R, typecontrol folders, and press Enter - The Folder Options dialog will open
- Click the View tab
- Look for “Hide extensions for known file types”
- Make sure this box is unchecked
- Click Apply and then OK
How to Change File Type in Windows 11?
Fix 2: Check via Registry Editor (Advanced)
If the above does not work, a Group Policy or registry setting may be enforcing the hidden extension behavior:
- Press
Windows + R, typeregedit, and press Enter - Navigate to:
HKEY_CURRENT_USER\Software\Microsoft\Windows\CurrentVersion\Explorer\Advanced- Find the value named HideFileExt
- Double-click it and set the value data to 0
- Click OK and restart File Explorer (or your computer)
Setting HideFileExt to 0 forces Windows to show all file extensions.
Fix 3: Group Policy (For Work or School Computers)
If your computer is managed by an organization, the IT department may have a Group Policy that prevents showing file extensions. In that case, you will need to contact your IT administrator to adjust the policy, as you will not be able to override it yourself.
Problem 3: The Rename Option Is Greyed Out
If you cannot rename a file at all, the file may be currently open in another program, or it may be a read-only system file.
Steps to fix:
- Close any application that might have the file open
- Right-click the file → Properties → make sure Read-only is not checked
- If it is a system file or located in a protected directory (like
C:\Windows), do not rename it doing so can destabilize your system
Problem 4: Internet or Network Issues While Downloading Files to Rename
Sometimes users download files in the wrong format and face extension confusion immediately. If you are also dealing with connectivity issues on your Windows 11 machine while trying to download or transfer files, check out our guide on how to fix DNS server not responding on Windows 11 it covers 5 easy fixes that resolve the most common Windows 11 network errors in minutes.
Quick Reference: All Methods at a Glance
How to Change File Type in Windows 11?
| Method | Best For | Skill Level |
|---|---|---|
| File Explorer Rename | Single files, quick changes | Beginner |
Command Prompt ren | Bulk rename in one folder | Intermediate |
| PowerShell | Bulk rename including subfolders | Advanced |
| Default Apps Settings | Change which app opens a file type | Beginner |
FAQ: How to Change File Type in Windows 11?
Question 1: Can changing a file name extension corrupt my file?
Answer: Yes. Changing the extension only changes the name that Windows reads; it do not convert the actual data inside the file. If you change an extension to an incompatible format (such as renaming a .docx file to .mp3), the file will become unreadable. Always keep a backup copy before making any changes.
Question 2: Can I bulk rename file extensions back to their original format if I make a mistake?
Answer: Yes, the process is fully reversible. If you used Command Prompt to change .txt to .csv, you can simply run the reverse command ren .csv .txt in the exact same folder to restore all your original file extensions instantly.
Question 3: Why is the file extension option greyed out or missing in Windows 11?
Answer: This usually happens if your user account do not have administrator permissions, or if a system group policy is restricting the changes. You can try unlocking it by opening the Control Panel, navigating to Folder Options, clicking the View tab, and unchecking the box that says. Hide extensions for known file types.
Question 4: How can I change file types in Windows 11 without renaming?
Answer: If you need a true format conversion, you must use a dedicated software or an online converter tool instead of renaming. For example, you can open a document in Microsoft Word and use the “Save As” option to select a new format, or use Microsoft Paint to export a .jpg image as a .png file.
Final Thoughts
Now you know every reliable method for how to change file type Windows 11 from the simple right-click rename in File Explorer to advanced PowerShell commands that handle hundreds of files in subfolders at once. You also know the critical difference between renaming an extension and actually converting a file, which is where most users run into trouble.
The key takeaways are simple: always enable File name extensions first, always keep a backup before making bulk changes, and use PowerShell when you need to bulk rename files across multiple folders. If a file stops working after you rename it, the extension renaming process is fully reversible just rename it back to the original extension.
For anything that requires a true format change (like converting a Word document to PDF), stick with a dedicated conversion tool rather than relying on extension renaming alone. And if you ever run into other Windows 11 problems along the way, SmartTechFixer has step-by-step guides covering everything from fixing slow WiFi connections to system-level Windows errors all in plain, easy-to-follow langu